Life Drawing
All my life drawing made through the first year of this course will be posted on another page of this blog which can be accessed either by the button below or from the menu (upper right corner).
What is Animation
Animation is made by rapid display of a sequence of images to create an illusion of movement. In Traditional Animation the images are drawn or painted by hand to be later exhibited in sequence in terms to make a film. Today, the most wide spread type of animation is CGI (Computer Generated Imagery) which is most commonly used to refer to computer generated graphics, animation, special effects etc. Other commonly used animation techniques inlclude stop motion (3D objects physically manipulated between individually photographed frames), 2D animation (2D images physically manipulated between individually photographed frames) and motion graphics (animated graphics that tell a story using animation as well as photography)
Animation Fundamentals
~ 12 Principle's of Animation
- they form the basis of all motion work. The principles were first introduced by Disney animators Olli Johnston and Frank Thomas in their book "The Illusion of Life: Disney Animation", which which was originally released in 1981.
Cinema 4D Workshop
|
Pulsating Swarm from Moon Sun animated on Vimeo. |
The purpose was to create a short animation in collaboration with another student. We each have received a topic with which we was supposed to work.
The topic's of this animation was; ,Frenetic swarm' and 'Pulsating mountains' |
# Simple object personification
|
In terms to animate the characters efficiently and in interesting way, animators have to be able to make even the simplest forms interesting and full of the character they supposed to represent. With this in mind I tried to make a short animation featuring two simple primitives with completely different personalities.
The two personalities I was working with was: Clumsy and Proud |
Clumsy n' Proud 3 from Moon Sun animated on Vimeo. |
# Walk Cycle
|
Walk Cycle from Moon Sun animated on Vimeo. |
This short animation presents really simple walk cycle to show the mechanics of human body movement during walk. |
# Emotive Walk
|
Following the simple walk cycle above I have made more complex one that was supposed to imitate a drunken person's walk. Again this was supposed to give some personality and character to a really simple model. |
Drunk walk from Moon Sun animated on Vimeo. |
ZBrush Workshop
Character Design workshop in collaboration with BA Animation students.
Semi-hatched egg & Grotesque beauty queen
Karolina Bienkowska & Adam Quinn
Semi-hatched egg & Grotesque beauty queen
Karolina Bienkowska & Adam Quinn
~ Development
Digital Sketches
The development stage contained sketches and working with silhouette's to make sure that he final model is clean and easy to understand for the possible audience. I have used Webchemy as well as Photoshop for the later sketch (last silhouette on the right is made in Photoshop as well) to achieve the effect visible below. I have shown here both stages of those sketches to emphasise the importance of the silhouette.


|
|
Paper Sketches
Some of the initial sketches, mostly showing the different ideas i had through the time I was working on this model. Different head shapes, horns, eyes, legs etc. Even if I haven't used all the ideas from those pages, I believe they are worth uploading as they sort of show the journey this design went through.
|


~ Outcomes

Final sketches. Above sketches only, showing my take on 'Semi-hatched egg' theme. Here we can also see the final silhouette, in two versions as well as only the sketched part in the bottom left part of the image.
|

Final sketches of the two characters we were working on during the collaboration project. We have decided to use the fantasy creature I've made as a pet for the other character to link them further and make the final scene appear more interesting.
|
|
The final renders of the fantasy creature I made. For the T-pose I have decided to use only the main creature , because if this was actually animated the egg shell would be only a kind of a prop, temporarily on the scene, whereas the creature is the proper character. Also this way will be much easier to rigg it later on if I needed to. However my theme was 'Semi-hatched egg' so the egg itself is really important part of the design, and this is why I have uploaded another, final, image on which I have presented the whole design (right).
|

|

As an addition to the main images above, I thought it could be interesting to add a few more shots, showing the model from different angles. I was thinking that this could to give the viewer better visual understanding of the concept.
~ Final 3D Model
|
|
I have decided to upload the final, finished character design as a 3D object so that the viewer can see it from any angle or perspective they want. |
~ Final designs
|
This picture shows both of the characters together, the final outcome of the collaboration project. We have decided to make the collar and later the lead to link them even stronger together as well as to show kinda story behind the image. The intention was to show the relationship they have as an owner and a pet. |

|
3D Fundamentals
# Low Poly
Box Modelling - Key Project
~ 1
|
|
A key modelled in Maya using the box modeling method. Box modelling is a technique of using simple primitive shapes to create a low poly base for sculpting the final model later. |
~ 2
|
Continuation of the box modelling project. Here instead of extracting everything from one main primitive I had to use a few separate ones (circles on top of the key). I have decided to make this one only to practice modelling in Maya. |
|
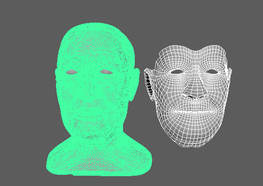
# Retypology
|
- Is a process of redoing the typology of the model in terms of either correcting the bad existing typology or simplifying it. This allows the artist to work more naturally and freely with the original high polygon model (in program such as Z Brush or Mudbox for example) to later decrease the poly count by laying a low poly mask on top of it. It is widely used by digital sculptors to convert their models into usable assets in game or film projects
|
~ 1
High poly model

|

|
|
\/
|
\/
|
Retypologised, Low poly model

|

|
~ 2
I have also decided to retypologise the model I did for the previous Zbrush project, to practise the technique.
High poly model

|

|
|
\/
|
\/
|
Retypologised, Low poly model

|

|
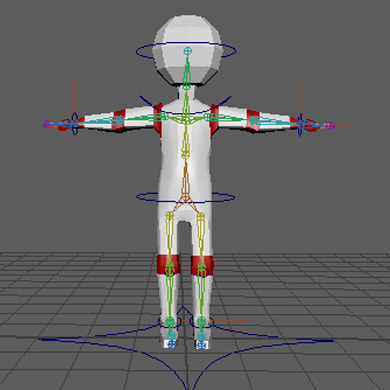
# Rigging
Rigging is simply a process of creating a digital skeleton for a 3D model (mesh), in terms to be able to move it. As well as creating a relationship between the mesh and the skeleton (called skinning, enveloping or binding) and adding a set of controls that the animator can use to push the model around. If a character doesn't have a rig, they cant be deformed or moved around which makes animating it impossible as the model is stuck in the pose the modeller presented it in.
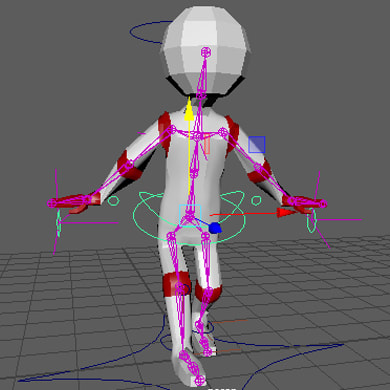
Here are some screenshot of the experimentation with the movement and checking the connections, weights and ik's as well as making sure the 'bind skin' command works properly on the model.


|
I have made a jumping pose to show if the rigging process was successful, and later on, i figured that to make it slightly more interesting and fun I could make a little scene, so I have added second figure in similar position and drew the trampoline in Photoshop. |

|
# Pose to pose
poses depicting different actions, feelings or/and expressions
-with addition of sketches drawn from observation
|
Those are simple and rough sketches that was supposed to help me with the task. |
|


Pictures showing different poses I have made.
# Pose A to pose B (with one transition)
|
Here, again, we have some rough sketches, helping me with the understanding of the pose. They hepled me imagine the pose which then was translated to the model. |
|


|
   |
# Lighting and Rendering
~ 1 Three-point lighting
~ 2 Lighting Challenge
Three pictures of the same scene, creating completely different atmosphere and mood through the difference in light and angle.

|
A room during the night, with limited moonlight. |
|
Early morning with creepy, alien light coming from behind the camera. |

|

|
Very early, sunny morning. |
# Hard Surface and Organic Modelling
Mountain-top medical station in the Art Nouveau region of Calvino
~ Photos and Webchemy experiments


Just a few Wechemy experiments, to get the ideas started, as well as some pictures i took of dried plants. They instantly reminded me of the leafs used often as ornaments in Art Nouveau style.
|
Later when i was looking for some inspiration for the models, I have found those pieces of art. Which inspired me to use their general concept and turn it into something that will fit my theme. |
    |
~ Sketches
Organic (natural, soft shape, not man made)

Some sketches of my experiments with the classic Art Nouveau leaf ornament.
|
Hard Surface (hard edged, man made etc.)
A sketch of the idea I had to use a woman figure and a lot of fabric. I believe that the use of those two elements characterises the movement (among other elements). I also wanted to use the wings and 2 snakes as it is the symbol of medicine.
|
~ Modelling
Main, simple structure of the models I made. Pictures of a second stage of the design, before further development, to picture the process.

|

|


~ UV's and Baking
Some screenshots of the process of unwrapping the UV's as well as the process of baking/projecting the high poly details onto the low poly model. Leafs on the left column and sculpture in the right.
|
|
|


~ Texturing
Finished models with some texture applied. I tried to imitate an old destroyed by time and the weather conditions stone statue texture.

|

|
~ Final models separately
In my imagination the models had some moss and snow on them but for some reason i couldn't add those in Substance Painter even if it was working on other models i had. I have decided to add some of those effects in Photoshop and here is the effect of that.

|

|
# Final - together
|
Just for fun I have decided to present both of the models in the environment I have imagined them in. When I got the theme, I though that sculpture like this could be an entrance to a hidden, secret medical station in which many weird experiments were taking place. And because of all the chemicals used there, some anomalies are happening like the stone leaves on the bottom of the sculpture are slowly turning into real leaves, and more. |

|
# Artists Garden
We have been asked to create a 3D garden inspired by one artists previous practice.
The artist by which this garden is inspired is: - Leonora Carrington
by: Karolina Bienkowska & Nora Bouchtat
~ Little gallery of the artists works we used as an influence.


~ Sketches and Assets
Sketches
~ Progress
Since in this case the modelling or texturing wasn't the outcome I was asked to produce, I figured I will skip those steps in the process here, especially that the previous project illustrated that well.
Here I start with some screenshots of the first try's to import those textured models into Unity and start building up the planned scene.
Here I start with some screenshots of the first try's to import those textured models into Unity and start building up the planned scene.


I have uploaded the textured models here as well as their later use in the unity space. I also want to show the change in the colour of the model depending on the light in the scene, which in my opinion only increases the mood and atmosphere withing the scene.
In the final scene some of the colors and textres differ slightly from the ones in Substance painter, in the future I will try to find out what causes that and how to fix it.
In the final scene some of the colors and textres differ slightly from the ones in Substance painter, in the future I will try to find out what causes that and how to fix it.
|
|
|
|
|
|
|
|
|
|
|
|
|
|

|

|

|
# Lipsink Project
|
First stage of the project - main 3 breakdown poses with the sound. No facial expressions yet. |
|
Second stage of the project, where I created the face movement with the most focus on the lips movement. To show this clearly I have deleted the poses in this video. |
|
|
|
Third and almost final stage of the project. Here i had both, main poses and the lip-sync, the only thing left was making sure the whole animation is correct and smooth. |
This is the final animation for this project, except of the sound and character movements I have decided to add some kind of scene, to explain why I have chosen this gestures. I have never checked the translation of the audio, as i wanted to concentrate completely on what I heard, if I had the translation I would probably try to copy the way the word was written.
I have imagined the lady voice being a museum tour guide, who was showing the tour an artwork by "The Great Giotto"...
I have imagined the lady voice being a museum tour guide, who was showing the tour an artwork by "The Great Giotto"...
# Characters in Situ (workshop)
The outcomes of a weekly modelling workshop in pairs inspired by 2 reference images.
Environment: Karolina Bienkowska
&
Character: Jess Fung
Environment: Karolina Bienkowska
&
Character: Jess Fung
~ Progress

|

|
The original reference picture i received. I based the environment scene on it and I have decided to cooperate the original broken concrete philar idea in the scene. |
|
On the right there is a sketch of the ideas i had after seeing the reference picture. Normally i would draw a few of them and choose the best idea, but this time i instantly had the vision and I have stick to it until the end. |

|
~ Silhouette play (webchemy)


~ Final environment scene
|
|
The final environment scene I have made. Inspired by a picture of concrete philar in ruin. |
~ Final model
|
Next, both final models displayed together and ready for 3D printing. |
|
~ Renders of the final
Underneath there is a few renders of the final scene with both the models featured.


# VR 3x3 Environment (workshop)
The task is to create a 3x3 VR environment based on the character reference we were given. The 3D space is supposed to be a habitat for the character, a room or a place (natural habitat) he/she lives in.
Karolina Bienkowska & Luke Arnold
Karolina Bienkowska & Luke Arnold
~ References and inspirations

|
WISE ALLAN Original reference picture we received on the beginning of the project. Below: charcter profile sheet
| ||
|
A few sketches and notes from the beginning of the project. First concepts of the environment.
|
A quick Mood Board to pin down some ideas and reference pictures on the beginning of the project.

|


~ Assets
Since I have already shown the process of creating and texturing assets in the previous projects on this blog, here, I will only show some renders of assets prepared for this workshop.
Sketches of the assets


|
|
~ Development
Some screenshots of the development of the room (in chronological order).
|
|


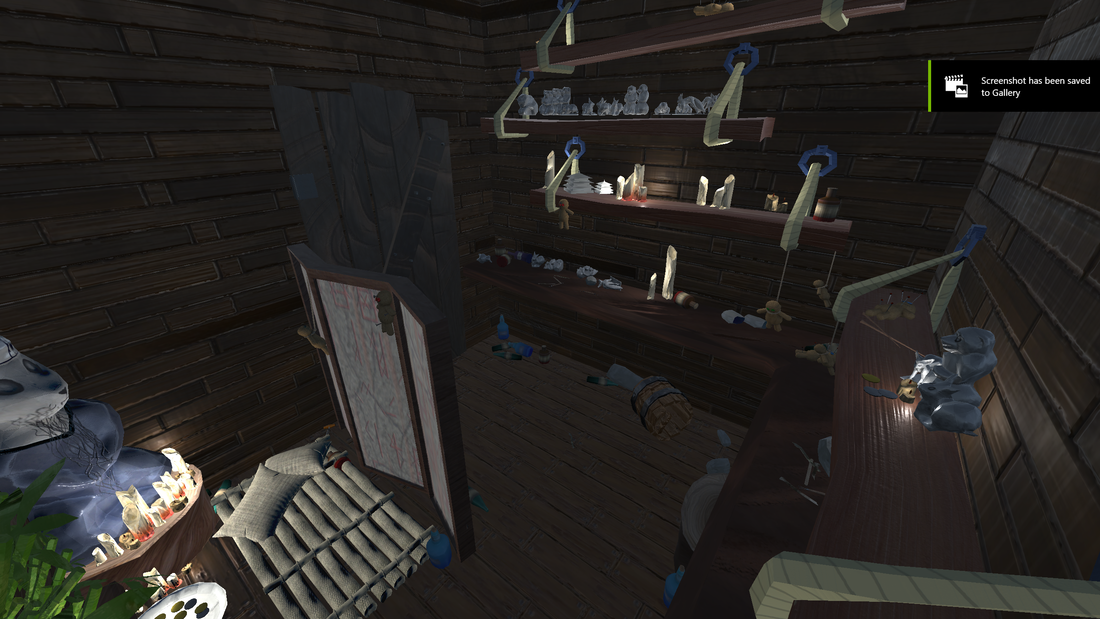
~ Final room
Screenshots and a final video of the final room, with all the assets and lights assembled.
~ The video of the VR environment
A few screenshots of the game