Life Drawing
All my life drawing made through the second year of this course will be posted on another page of this blog which can be accessed either by the button below or from the menu (upper right corner).
Asset Design
#1 Vertex Painting
Box modeled and vertex painter basic scenes - Box modeling recap and vertex painting introduction.
~ Food platter - Fresh Bakes & Latte
|
|
Plate of chocolate chip cookies, cupcakes, meringue cookies and coconut macaroons with latte coffee (served on a saucer with a spoon and two white sugar cubes) and a lollipop. Box modeled and vertex painted in Maya. |
Asset Breakdown


~ Low poly, vertex painted environment
- inspired by a background from a 2D Animation.
Looney Toons, Merry Melodies starring Duffy Duck - (ep.135) - The Night of the Living Duck (1988)
The beginning and the end of the episode is based in the room of in character, with a bed, bookshelf some lamps and cupboards as well as a tone of comics scattered on the floor and bed.


|
Finished 3D box modelled and vertex painted scene, showing a digital version of Duffy's room on the beginning and the very end of the episode. Slightly different lighting than in the original scene but the colors in sketchfab shows slightly different than in Maya and adjusting the light in this way I was able to get the colours to look closer to what I intended. Also I believe that this lighting actually enhances the visual aesthetic and atmosphere of this scene. The colors could be brighter thought, here they look a bit more dull ad realistic than in the 2D series I chose to model. |
|
Process
Screenshots showing both mesh and wireframe.
Sketching out the main shapes of walls, furniture and some posters.


More details and definition to the assets, mostly finished scene, missing only a few minor elements.


All modeled, wireframe and mesh for all except walls and scattered on the floor and bed comics. Some models with added subdivisions in particular places in preparation for vertex painting (pictures, walls >for the shadow<, comics in one corner).


Vertex painting in different stages.


Asset Breakdown


#2 UV and Hand Painting (3D Coat)
|
|
Hand painted simple dagger and it's unwrapped uv shells - Maya and 3D Coat

|
#3 Quixel Mixer Textures
~1
|
Reference
Process
|
Final Texture

|


Experiment (more details added)


~2
|
Reference
Process
|
Final Texture

|


Experiment (more details added)


~3
|
Reference
Process
|
Final Texture

|


Experiment (more details added)


Diorama Project
#1 Digital paintings (summer project)
The task started with a summer project in which we were asked to hand paint 5 digital paintings from random locations in the world. This was supposed to give us a base for the design that later we were to display as a 3D model.
Below are my digital paintings of the locations I have chosen to work with.
Below are my digital paintings of the locations I have chosen to work with.
|
~1 This is Persian stepped travertine terrace formation of little lakes connected with hot springs. |

|

|
~2 Huge roots of a tree on ruins of a temple in Cambodia. |
|
~3 A so called 'Living Bridge'. It is a form of tree shaping commonly practised in the southern part of the Northeast Indian state of Meghalaya. (I ended up not using this) |

|

|
~4 Ruins somewhere in England. |
|
~5 A part of the ancient city ruins of Polonnaruwa in Sri Lanka. |

|
#2 Initial ideas
Including preparation sketches, generating ideas and planning.
The sketches here are very rough and there is many notes on them, they are just visual quick notes of the ideas I had.
The sketches here are very rough and there is many notes on them, they are just visual quick notes of the ideas I had.
~ sketches

|
First idea I had was two islands with different ruins connected by a bridge. This sketch shows best the idea of placing the stepped lakes on the side of the island, which I did used in the final sculpt. |

|
Later when I decided I want to do something different it evolved into two level island with weird, ruined stairs. |

|
|
In the end I have exchanged the ruined stairs for floating wooden discs which were supposed to be used as stairs. |

|
#3 Development
All pictures are in chronological order, showing the process of the development in the form of screenshots.
~ Island structure
First part of the development stage for me, is to start sculpting the main structure of the model. This focused mostly on the island itself. Firstly sketching out the island then adding the stairs and later the lake parts. Here I have also tried to do the bottom of the islands, but right now I'm not sure if it will work with the final model.


~ Ruin structure
Next step is box modelling the structure of the ruins, adding a bit more details later or.
In this step I will also probably work on a few simple trees with their roots to put on top of the main ruins from the bigger level of the island (top part).
In this step I will also probably work on a few simple trees with their roots to put on top of the main ruins from the bigger level of the island (top part).


~ Adding details
Following stage would be to combine all the modelled parts and work on the details of the whole.


#4 Final outcomes
~ Final Model
|
|
A final model of the diorama floating island with no texture applied. |
~ Textured
|
Half way through textured. I'm planning on refining the texture in the future, the cliff is too light, trees too dark and all needs some imperfections to make it more lifelike. |
|
|
|
Fully textured diorama. Desert cliff floating islands with ancient ruins, trees, a cave, mineral lakes and floating round stairs covered with moss. In the last stage I am planning to add some grass to the mossy parts of the cliff around the ruins, I believe this can add detail and definition to the scene as well as make it appear more complete. |
|
Final Diorama scene, fully texture and with the addition of some grass (Unity). |
Failed experiment - I couldn't figure out how to upload a 3D model with the grass and in the video - to show the whole scene - the camera is too far away which results in the grass not being visible well enough and the view is blurred in general. The colors in unity are also quite far away from what I intended.
Hopefully I will find a better way to display this scene in the future. |
Animation Techniques
#1 Rapid poses
Class exercise, a few poses to practice putting the model into a particular pose. The first 6 was my attempts to depict emotions for:
1. I won, 2. I lost, 3. Something just died, 4. I'm ready to punch you, 5. I'm elated, 6. Live and let live.
Following are extra poses I did to practice showing waiting for something and stretching.
1. I won, 2. I lost, 3. Something just died, 4. I'm ready to punch you, 5. I'm elated, 6. Live and let live.
Following are extra poses I did to practice showing waiting for something and stretching.


Screenshots of main poses of a short animation inspired by the countdown scene in the Deadpool movie (jumping over a car with a backflip in the end).


|
Short animation linking the basic poses showed above. |
#2 Lip Sync Animation
Working with the Mery project model and a part of a interview recording from the 'Oral History' collection of the Imperial War Museum archives.
|
|
A quick screen-record of the first stage of the lip sync exercise - just blinking and the lips movement. |
|
Second screen-record of the progress. Slightly refined lip sync, breathing and first head movement added. I have also set up the camera and lights in this step. |
|
#3 Creature Animation
Working on a already rigged model, to work on my animating skills.
|
|
I have started with a simple outline of the walk cycle, very robotic, no flexing of the body, no weight follow, just the steps and trying to make the timing of the walk look natural. |
|
An addition to the main walk cycle, some tail sweep, and body shift as well as some head movement. Also a little tweak of the animation splines to make it smoother. |
|
|
|
Third stage - defining the tail and the body movement, |
|
|
|
Two playblast videos of the progress - both showing the same stage of development, on the left one (allosaurus walk cycle 4) a mistake in the movement of the head and neck is clearly visible.
|
Partially fixed head movement. |
|
|
|
Camera added Playblast from the camera view. |
|
Head movement roughly fixed and roar added (needs tweaking) - perspective view playblast. |
|
|
|
Playblast from the camera view, with all movement, floor and sky in place. |
|
Final playblast with sound, which should have been a final render, but I found out that for some reason I cannot render this model. Shows the animation quite well except very bad quality and a few "hiccups" in the movement which were not in the maya file. The camera movement here is also slightly less fluent than i've originally made it. |
|
#4 Motion Graphics Sequence
|
mograph 1 from Moon Sun animated on Vimeo. |
|
mograph 3 countdown from Moon Sun animated on Vimeo. |
mograph 7 particles from Moon Sun animated on Vimeo.
Walking Simulator
A workshop project:
Karolina Bienkowska
&
Nora Bouchtat
Karolina Bienkowska
&
Nora Bouchtat
#1 Initial Ideas (Planning stage)
A few beginning sketches of some parts of the building, as well as plans for the shape of it.
The Walking Simulator will show only the interior, but I thought that it is a good idea to roughly plan the shape too.
The Walking Simulator will show only the interior, but I thought that it is a good idea to roughly plan the shape too.


#2 Development
~1
The gameplay showing the first stage of the process - the base of the building in which the game is based.
There are a few imperfections that I am planning to fix or cover, the lighting will be rebuild as for now I have used only a few spot lights to see inside (after I placed the ceilings). I also might need to fix some UV's.
There are a few imperfections that I am planning to fix or cover, the lighting will be rebuild as for now I have used only a few spot lights to see inside (after I placed the ceilings). I also might need to fix some UV's.
A few screenshots after experimentally adding some textures.


Material - Experiments
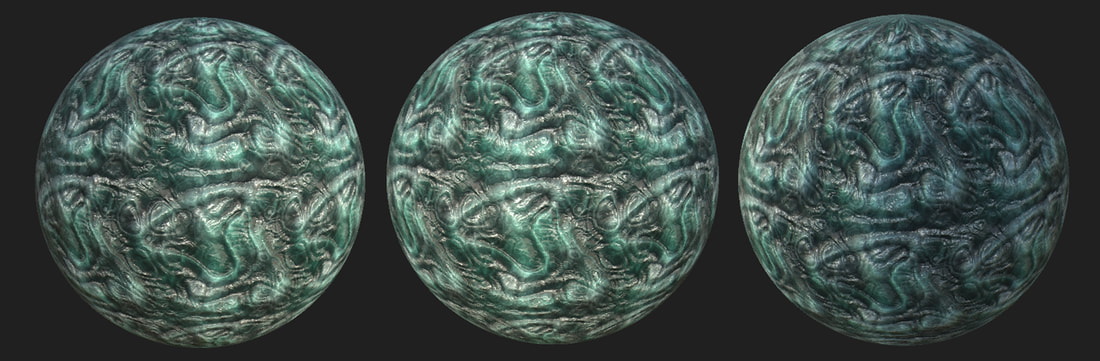
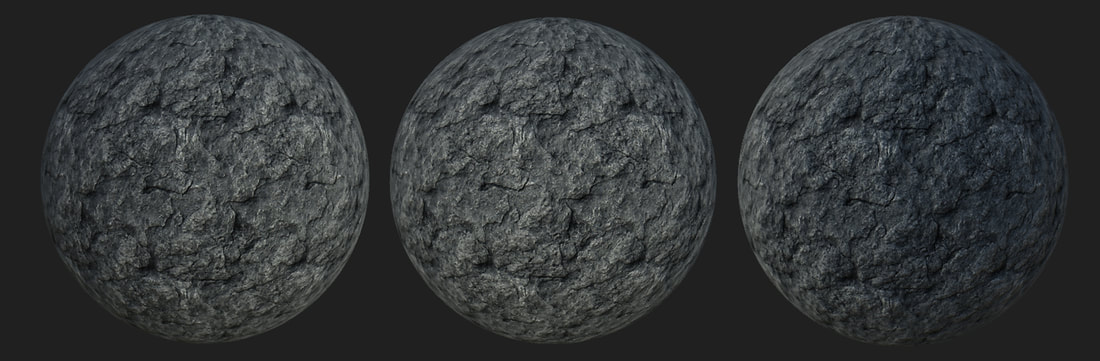
A few materials I have made for the project. I have used some pictures and the Substance Alchemist program to make them.
I have made the obsidian and marble materials in different colors in terms to try out which will look best and convey the mood I planned.
I have made the obsidian and marble materials in different colors in terms to try out which will look best and convey the mood I planned.

Alabaster

Books (1)

Black Marble (1)

Red Marble
|

Obsidian (1)

Books (2)

Black Marble (2)
|

Obsidian (1)

Books (3)

Green Marble
|
~2
Second game-play screen record, showing the second stage of the development, where I have decided to narrow down the project to particular 4 rooms, made my mind on some of the materials and color schemes and started adding the details of the building base (columns, doors, wall candle mounts etc.). I have also worked on tidying up the UV's so the materials align better.
Assets added so far.


~3
New Models

Soundtracks
|
|
|
|
|
|
~4
New Models


~5
New Models


~6
New Models


~7
New Models


~8
New Models


~9 - The Unknown - Walking Simulator - final walkthrough
New Models


#3 Final Renders


Portfolio Project
Environment Art
Development of a presentational piece for a specialist practice alongside some research of professional artists portfolios relating to the specialism of a choice.
Some examples of professional Environment Artists Portfolios.
|
Wiktor Öhman
http://artbywiktor.com/index.html Sarah Greve http://sarahgreve.weebly.com/environments.html Michael Kooper http://www.michelkooper.com/crysis3.html |
Robert Hodri
https://www.artstation.com/robhodri Nicole Tan https://www.nicole-tan.com/ Megan Sawyer http://www.ghostgirl.net/ |
~Models of Fantasy plants
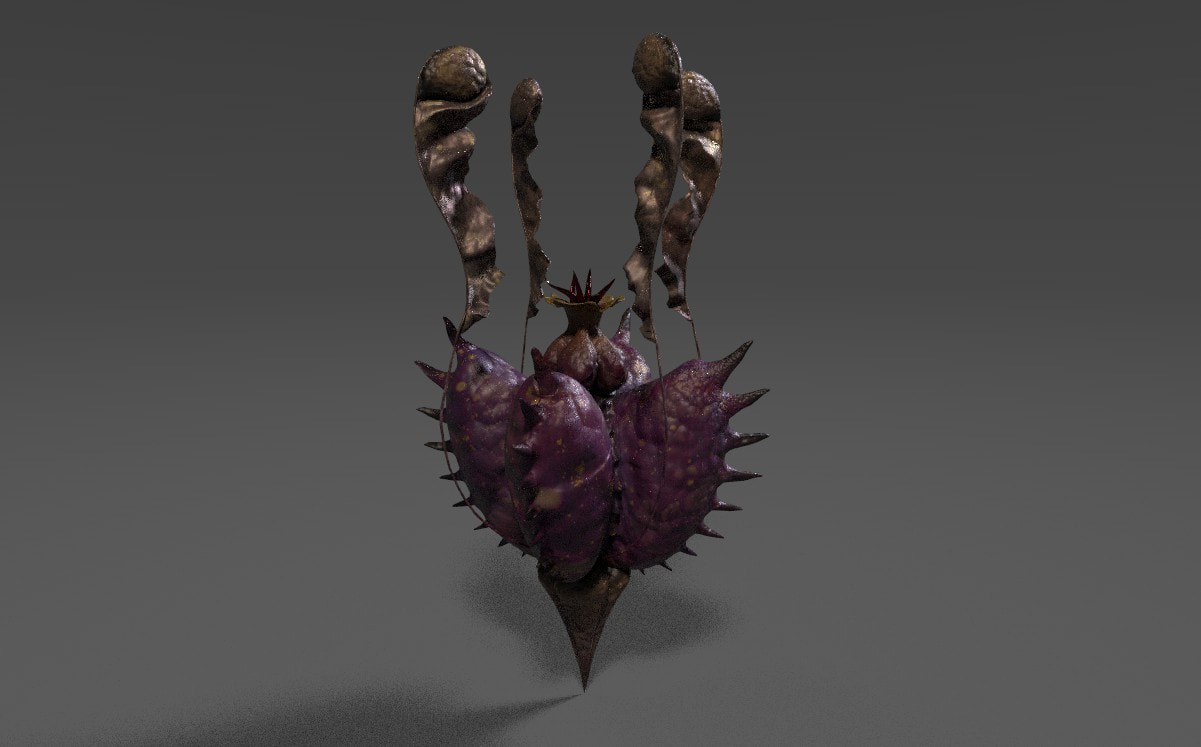
Plant 1 - Hamatis Remugit
|
|
First plant I have made for the scene for this project. I have designed this plant a while ago and now I have decided that it fits perfectly to what I have planned to make. |
~Progress
Ideas and Development
|
Not much development here, I have drawn this fantasy plant quite a while ago and I wanted to make it into a 3D model for a while, it fits well with what I wanted to make for this project, so here we go... I often just doodle, then add shading to whatever came out of the sketch developing it further, which is the reason for no development sketches for this design. |

|
Modelling


Texturing


Final Model
Often while drawing fantasy plants or animals I am thinking of the way they would function.
I think of this plant as carnivorous, belonging to the ecological group plantae carnivorae (carnivorous plants).
The four antennae like trap leaves are coated with a sticky substance that lures small animals and insects which then get stuck in it. The leaf folds down towards the center flower like part where the tentacle like antennae gather the food and pass it down to the mouth opening where it is digested. Every plant of this genus has four seeds placed on the ends of the trap leaves. When the plant dies they fold outwards and eventually lies down on the ground where outside shell decomposes, allowing the shell to grow the root and further develop into an adult form.
Renders


Plant 2 - ...
Plant 3 - ...
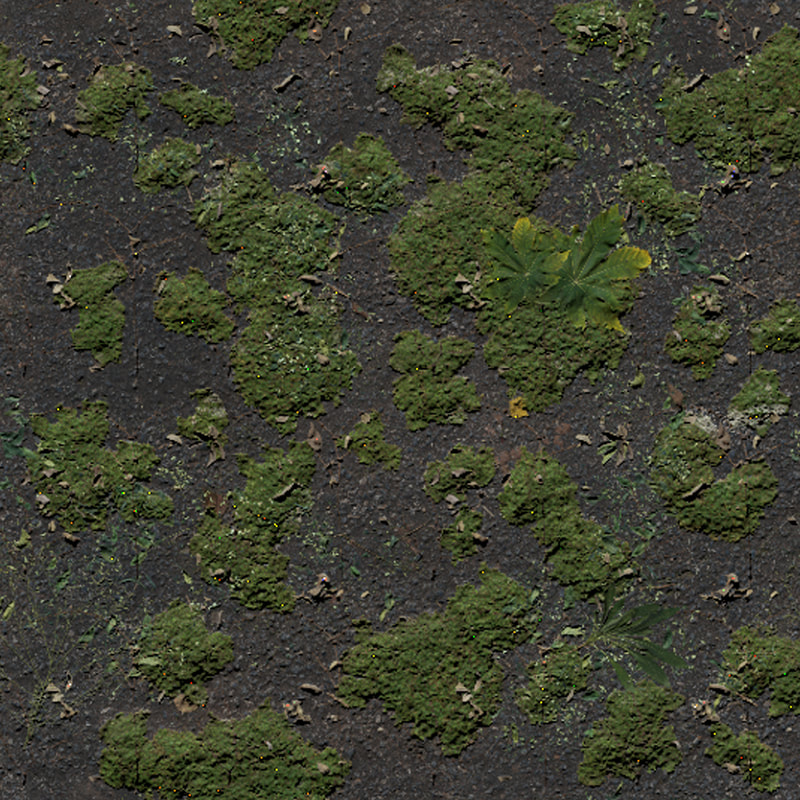
First Stage (Terrain + Vertex painted Texture)


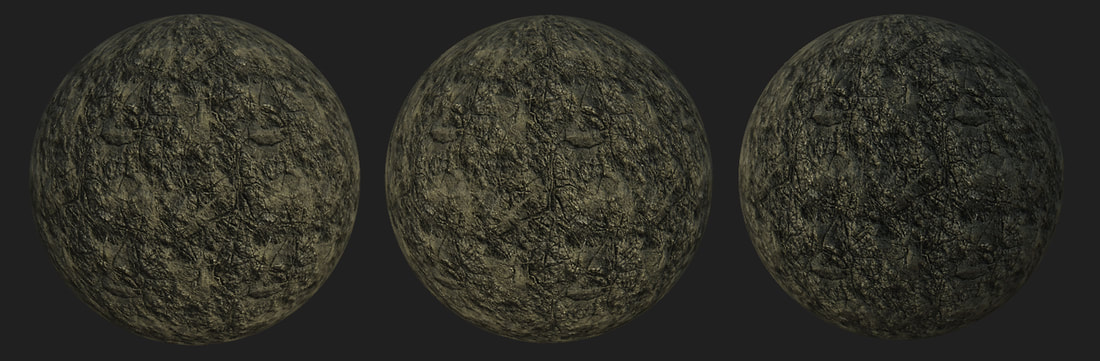
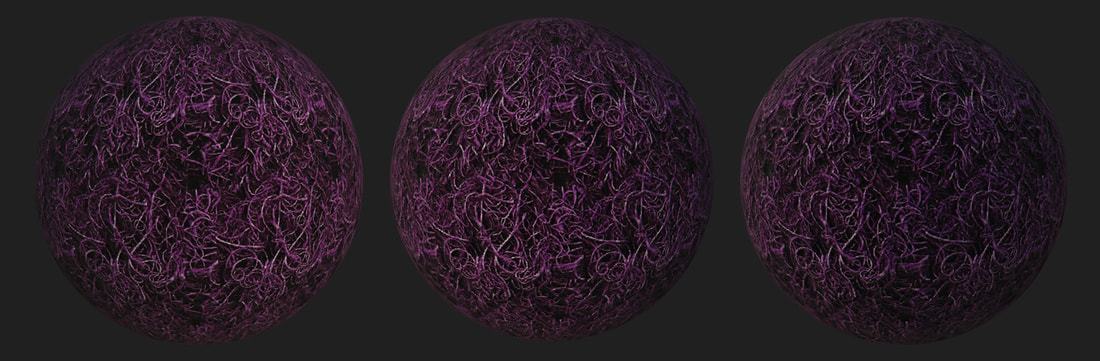
Materials (Substance Alchemist experiment)
|

|
Specialist Pathways
For this project the brief asks to create three objects based on primary research
|
|
~ Inspiration

|
A while ago I saw this ring on the internet and from that time I was pretty fascinated with it, I bought it and shortly after that this project came along. I have decided to use this as my main inspiration and the base for the first object of this project. |
~Further Research (Ebay and Etsy listings as well as some pictures from Pinterest)
A few results of searching astronomy tools as well as vintage astronomy tools.


~Initial ideas and Design development
First sketch showing the beginning of the idea, a vintage globe and an astronomy tool. I have sketched the globe as I have decided to add a globe to the center sphere of the final model. On the second sketch I have explored the linking of a part of the previous sketch (the holder) with the type of the circles and sphere that I liked the most. The third and fourth picture show the different base possibilities, fifth links all together and sixth shows the final sketch with a smaller coloured version.


~Progress
Modelling & UV


Texturing
Materials used:
Worn Brass, Gold, Smokey Wood, Wood Walnut, Old Iron, Dust
Worn Brass, Gold, Smokey Wood, Wood Walnut, Old Iron, Dust


~Final Model
Renders


|
|
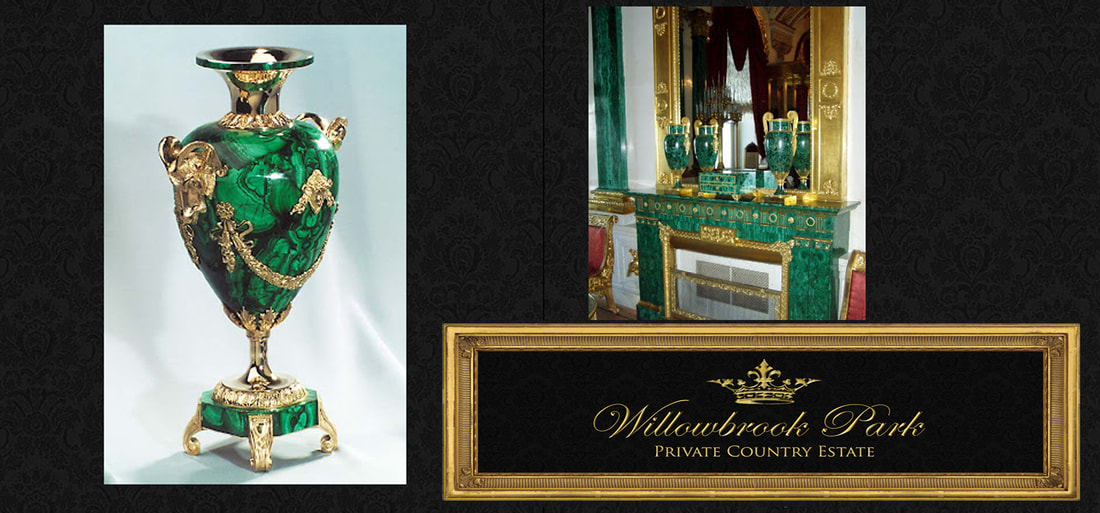
#2 Malachite Vase |
~Inspiration
|
I have originally found those pictures on Pinterest, then found out it was displayed in a London manor house called Willowbrook. This made me consider the idea of making a decorative vase from malachite as one of the models for this project. |
|
    |
After some more research I have also found those two on Ebay listings and I fell in love in the engraved metal idea, later joining the two. As I still liked the malachite idea a lot, I have decided to make the main vase shape and part of the base in the green mineral and the rest in engraved metal. |
~Further Research (Ebay and Etsy listings)
A few more research results. Mostly exploring different vase styles, shapes and material, as well as different ways of engraving application on vase like objects.
One of those reference pictures have also inspired the rope like link between the holders, on the middle part of the main vase.
One of those reference pictures have also inspired the rope like link between the holders, on the middle part of the main vase.


~Initial ideas and Design development
First and third picture depicts a few main vase shape possibilities, in second and third I was exploring the possible handle shapes. followed by base shape in fourth picture and the link between the main vase and the base on the fifth picture, with the final sketch and th ecolor trial on sixth picture.


